Wednesday, January 23, 2013

Making over the world...one little chair at a time

**Update** A big thank you and lots of love to Beckie at Roadkill Rescue, for featuring this little project. You can see it here.
Mwah!


It may seem very small, what we home decor/artist/designer types do. But I have a little chair in my basement that makes me feel otherwise.

This little friend.


She was sad, alone, and definitely had seen better days.


I've had those days myself... anyone else?
I picked her up in parking lot of my favorite thrift store and added her to my collection.

Then I got the chance to go to the Country Living Fair in Columbus, OH last fall.
Check out a video here:
AWESOME, btw.  You should go. I grabbed up some sweet fabric at one of the booths there (darn it, I can't remember the name. I'll update if I do!) - a laminated cotton with a red and white chevron print.  I didn't know where I would use it but who cares?! IT MADE ME SMILE. When I realized it would be perfect to recover my new chair, I went for it. This was an easy peasy project, made oh so simple thanks to the purchase of my electric staple gun. You could probably do it in an afternoon. The chair came apart in two pieces.  I simply unscrewed the back piece and then unscrewed the legs from the seat.  The original label was still attached, and I love that so I laid it aside.
Then I peeled the layer of (paper?) off the bottom.   It was basically disintegrating in my hands.
Next I took off the blue vinyl seat cover and added a new layer of batting for comfort.
Then I laid out the seat on my fabric - be sure to position it the way you want it.  It can be kind of easy to confuse the front of the chair with the back of the chair when the seat is sitting there all by itself. The I started stapling the new fabric on. This staple gun has been a lifesaver.  (I'm not getting paid to say this - just my experience.)
I'm learning that upholstering anything is about art as much as it is about science.  You just have to work with your fabric and see what looks best.  I am absolutely not an expert on upholstering.
Wa-la! Now for the back and seat. They were rusty.  I wasn't exactly sure what to do, so I just tried some fine grit sandpaper.
Worked like a charm!
Almost done... I had some black fabric that covers the bottom of upholstered furniture.  So I cut a piece out and stapled that on the bottom of my seat.
Then I screwed the legs back on. The I knew approximately where the screw holes were, so I just felt around until I found them with my finger.  I put the leg frame in place and started screwing it back on. The only slight hiccup was that the screws would "catch" on the fabric a bit, and it would start to twist and pucker around the screw hole.  To fix this, I would turn the screw in a little ways then unscrew it some to loosen up the fabric.  I repeated this until the screws were all in.  You'll just have to keep an eye on it.
I took the original label and stapled it back on.
I screwed the back on, same as the legs.
That's it!  This would be a GREAT first project if you are interested in tackling upholstery.  There's a ton of good info out there with more expertise about how to do it well, so go take advantage of it.  You can do it!!
Sometimes people tell me they're not creative.  Here's what I think... you don't have to be completely creative. You don't have to figure it all out yourself or come up with something no one else has thought of.  There are SO many ideas, tutorials, how-to's out there... so pick one with a good step-by-step and give it a shot. YOU have to power to make things better... a castoff chair, a thrifted picture frame, a lamp.  Pick something small and start there. It's a powerful message.  That even when something looks unloved, it has the potential to be great.  As do we all. It's empowering. And chances are it will make you smile. I know it makes me smile! This little beauty is going to the home of a friend, where it will be used by her adorable kiddos.  Win. Win.  :-)
XO, Anne
House of Rose

Saturday, January 5, 2013

Homerun! (baseball room reveal)

My oldest turned 7 over the summer and we moved shortly before that.  All in all, it was time for some new room decor.  His first "big boy" room was transportation themed and he loved it.  So did I.  But times change, and so we moved on to bigger and better things.

There are two major caveats that I should throw out there that made this room possible.  My awesome in-laws downsized, and we were the beneficiaries - very nice furniture.  We inherited:  a full size metal headboard and bed frame from Room and Board (similar to this), a dresser from Room and Board (similar to this), as well as a desk, nightstand, and two lamps.

He fell in love with baseball, so I set about giving him a slugger's space. (I took this pic in our backyard.)


Almost everything was found on the cheap. It took most of the summer, hitting yard sales, checking out eBay and Etsy, combing through Craiglist, and sifting through piles at my favorite thrift store.  I also worked online sales sites like Groupon.

We did grab in a new duvet cover, a simple navy and white stripe. (Found at Target, here)

The first thing I did was embroider a little design on one of his pillowcases.  He's a fan of both the Cincinnati Reds as well as the Milwaukee Brewers.  So with some embroidery floss, I stitched this on by hand.  Easy peasy.  It's washed up fine, too. (Like the wrinkled pillowcase?  Just keepin' it real, folks.)


I scored this shelf on Craigslist for $5.  Is it heirloom quality stuff? No.  It's plastic. But it fit our theme, and our colors so I added it.  It's a home for bobbleheads, little league trophies, and keepsakes from the pro games he's been to.


One of the lamps my in-laws gave us had this great, rectangular shaped shade.  It begged for a design.  I found a Babe Ruth quote, grabbed a paint pen, Googled a baseball-ish font, and 15 minutes later, had this:


This baseball mitt wall shelf was a thrift store find, and it holds a bat and a ball.


My Dad and I went to an estate sale, and in the barn/garage there was a big bucket of scrap wood.  I think we paid $5 for it all.  There were two different colors of painted wood, and as soon as I saw them I thought, "Those look like fence posts."  Instantly I remembered seeing a cute baseball sign about "swinging for the fences."  My Dad nailed them together for me and added a hanger.  I used my craft paints to add the slogan.  Done.


I found a vintage Cracker Jack tin at the Worlds Longest Yard Sale in August.


 I also grabbed some old baseballs and a bat there.  I sat the balls up on the ledge over his closet door.


I had a plain beige throw pillow from my in-laws so I painted on the word "baseball."


This wood caddy was another thrift store find.  I added the Brewers logo - using this technique. It's a place for him to store his baseball cards, game programs, etc.


I used stencils to add a sweet little detail onto the door to his room, to remind him that you should have something to aim for (Cooperstown is where the Baseball Hall of Fame is.  The mileage is the distance from our house to Cooperstown.)  It took 15 minutes but it makes me smile whenever I walk by...


This Reds poster was a find on Freecycle - which, if you haven't checked out, you should.  People post things they would like to get rid of, and if you want it, you email and ask and if you're first, you get it.  Free.  The letter B was from his old room, spray painted to match.  I think it originally came from HomeGoods.


We had a Groupon to a wall mural company, and Brady picked out this pic of Miller Park in Milwaukee.  From left to right, the Ryan Braun canvas was a birthday gift from a relative, the game towel was another gift, and the Brewers sign was an eBay win.


We added a mirror from our stash, at his height instead of above the dresser where you would normally put a mirror.   It's his room, and I want it to be something he can use when he needs to.  Then we added four double-pronged hooks to give all those baseball caps a place to live.  I didn't worry about screwing them into studs because they will only be holding hats.


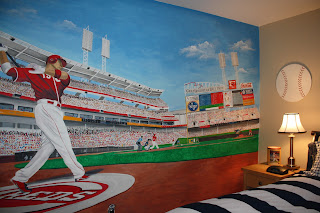
I've saved the best for last.  At a charity auction, my husband did something he almost never does.  He bid on something!  And not something little.  No, he bid on a custom painted wall mural done by a local artist.  And he won!  We knew right away which room this would be going in. :-)  My son chose a scene from Great American Ball Park in Cincinnati.  Keep in mind, we had done the rest of his room on a budget, so this was definitely our big splurge.  It took four whole days of painting (artist's website here).  But in the end, the result is a stunning, inspiring scene that makes this little boy's room an absolute home run!


If you are working on making over a room, my advice would be:

Take some time and search as many places as you can for second-hand items to add to it.
Add some inspiration, some positive thoughts.
If you are the creative type, include some personally done touches.
And don't be afraid to invest in a marquee piece!


I had so much fun putting this space together, for someone I love so much!

Thanks for reading!
XO,
Anne

Sharing here:


Funky Junk's Saturday Nite Special

mop it up mondays