Sunday, July 8, 2012

But I NEED a cute place to store my rags!

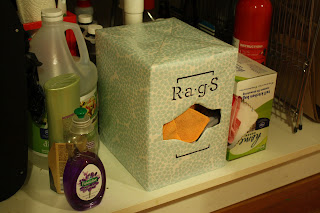
Friends, let me just say that I'm fully aware of my upper middle class life and all the blessings that go with it. There are so many people all over the world who have real, serious challenges they face. This is not one of them. But. I really needed a nice way to store rags under my kitchen sink, and the crumpled up wad of clean rags that I had shoved into a plastic grocery bag just wasn't cuttin' it anymore. SO yes, I did spend my Saturday night making a pretty box... for my rags. Here goes: I had an empty box from Costco that their kitchen trash bags come in. It's heavy duty cardboard, and has a really generously sized opening in the front. Just the right size, to say, shove rags into and pull them out of... Serendipity, right?!


I also had the remnants of a roll of the most awesome wrapping paper ever, thank you to Martha Stewart and Wally world.


I got scissors and tape, and it's pretty much as simple as this... I wrapped up the Costco box like a present. (Stay with me here)

I cut a hole where the box opening was in the front. I carefully cut it larger until it was just about the right size and shape of the actual opening. Then I folded the wrapping paper over the edge of the opening, and taped that stuff down so that Hurricane Andrew couldn't blow it off (because I will be shoving rags into this thing, like, all the time, and that's my favorite wrapping paper, darn it, and I don't want to have that piece wasted!)


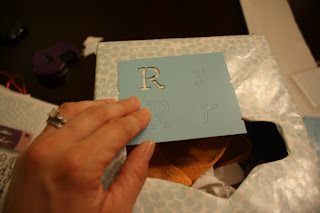
 Once that was taped down, I got out my black Sharpie. I got out my "typewriter" font set of stencils, thank you Martha Stewart, and Michael's.


Then, upon my pretty trash bag box, I stenciled, (still with me?) "RagS" I sat the box under my sink. I shoved it full of rags and rejoiced at my cleverness.


(ugh - btw, this wrapping paper looks yellow in some of these pics. It's not.  It's blue and white. )


So there you have it.  World peace? Um... no.
A peaceful sigh when I open up the cabinet under my sink to clean up the umpteenth spill of the week?  YES!

And PS - while I was at it, I made a little label and put my dishwasher detergent gel pacs in a thrifted glass jar.  Super smile!


Go in peace. Somebody probably spilled something while you were reading this.

 XO,
Anne

Linkin' up here cause it's awesome:
Frugalicious Friday @ Finding Fabulous

Custom coffee table

As I mentioned in the post previous to this, we have been getting rid of some of our furniture lately, to make room for some lovely new pieces from family members.


This post is about a rather plain, black coffee table that I've honestly had for the better part of 10 years.  A friend took me up on my offer to give it a custom paint job in the design of her choice, so it was game on!
The friend/client likes art deco, and waterfall furniture.  So I started Googling and hunting around Pinterest until I found this image - it came from the awesome blog, Little Green Notebook.


I was smitten!  I ran it by my friend, and she liked it, too!  Now... how to make my plain black table look like this one?


I am a hopeless eyeballer.  It's just how I am wired, I guess.  So I studied the pic and did my best to sketch out a version of the fretwork design on paper, which I'd then translate into table-size dimensions.  Once I had a version I liked, I primed my table, and spray painted the whole top a satin ivory.


A couple of coats later, I set to work with my sketch and my big metal ruler.  Here was the interesting part - because this eyeballer had to do some serious measuring and re-measuring to get this intricate design to look right!  I have to say, I am proud of myself for getting the calculations almost perfect.

Once the design was sketched out, I began painting around the design - meaning, I would give the table  a coat of brown semi-gloss, making sure to paint around the design on top so the ivory would be left.  It worked!  It was also a lot of work.  I way underestimated how long this project would take, but that's ok.

The straight lines were relatively easy to measure out and execute.  The art on this piece came in the curved parts.  Major eyeballing.  I am sure there are smarter people out there who know a way to use some device (French curve?) or calculation to make their curves more accurate.

I "warned" my friend about this - the piece she was going to get would have brushstrokes.  It would look hand-painted. She was ok with that.

The rest of the work was just really small paintbrushes and patience.


In the end, I think the result was worth all the effort.  It will truly be a conversation piece!


Oh, and one more thing.  I was super curious as to the origins of the table I pinned.
After some serious research, guess what I found out?

The table came from Horchow.com (it's sold out) and its price tag.....drumroll please..........................


"Entertaining" Coffee Table
Price:$1,039.00


As it turns out, I didn't AIM to get a look similar to that of a thousand dollar table.... But it sure is fun when you realize, you HAVE!

XO,
Anne


Linkin' up here: 


Long time, no posts.

Hi!
Remember me?  I run this little blog.  At least, I used to... man, the last several weeks have been nuts since kids got out of school, vacations have come and gone, and now we're in full time summer mode, which means mama's on duty a lot more!
Whew!

But...don't let that fool you.  I've still been working!  So I have some catch-up posting to do!

I'll start with two tables that we've owned for years, but since we just inherited a truckload of furniture from downsizing family members, we were starting to look like Value City Furniture around here.  So, the black coffee table and console table had to go!


Rather than taking them to Goodwill, I decided to offer them up to my Facebook contacts as candidates for custom paint jobs.  I got two takers! I'll post here about the console table, the taller of the two.

We decided the console table would stay black, and get a monogram and some detail on the drawer front.


This was our inspiration - an awesome hutch/cabinet done by a lovely lady named Michele, over at The Scrappe Shop Blog.  I pinned this baby a long time ago, and this console table was the perfect piece to try out a similar design!

She used vinyl on her piece, but I just used paint.


I found the letter T online that I wanted, printed it out and traced it onto posterboard.  That became my stencil.  I centered it on the top of the table and penciled around it, then used the ivory colored acrylic paint to fill it in.  Then I actually used a paper plate like the one above to trace a circle around the T so I could paint that, and then I freehanded some "leaves."  Disclaimer: I am a very eyeball-it kind of girl... I'm sure there are more scientific ways to transfer designs onto furniture... I just haven't gotten there yet.


I did the same thing for the drawer front, drew up a posterboard stencil to fit the drawer front, and repeated the pattern all the way across.  I LOVE how this turned out.  So striking, and honestly, easy!!  I could see using a paint pen for this type of work, too.  I just used very fine brushes.


This is one lovely table - a high-impact makeover with not a lot of work involved.  I'm thrilled to be sending this to the home of a good friend so I can see it in her foyer. :-)

Thank you, Michele, for the inspiration!!

Here's a view of the finished product...


So the next time you have to get rid of a piece... offer it to your peeps and try out a fun, new design.
Thanks for reading!

XO,
Anne