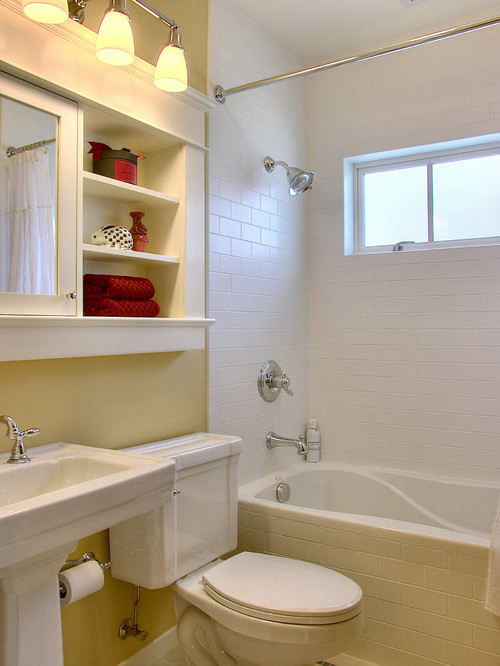
It took 6 weeks, a couple hundred man or woman hours of labor, and about $2,000 in materials to get this job done. And I am SO proud to finally be able to show you this!! Step right in!
(Here is the complete background on this room. In short, a family friend's house caught fire last year. Insurance paid for everything except her only bathroom, which dated to the prehistoric era. She desperately needed a complete gut job and reno, so my Dad, his good friend, and I set out to give it to her, pro bono.)
The light, you might recall, came from National Builder Supply. It is a Seagull Lighting fixture from their Sussex line and Dad chose to hang it with the bulbs facing up. The light gets bounced around on the ceiling and diffused nicely in the space. Bathrooms must have enough light! This fixture is like the crown in this room.
The vanity came from Lowe's and included the granite countertop.
The faucets are Moen, the Caldwell line.
We really wanted to be able to get rid of a storage tower over the toilet. Really.
It was taking up way too much space in this tiny bath. Here was the inspiration photo we worked from.
And here's the design I sketched out once we found out that we wouldn't be able to do one wide set of shelves because there is a pipe that runs vertically right behind the toilet.
The thick white arrow represents where the pipe runs.
I had to either abandon the built-in idea, which I did not want to do, or work around it. So I worked around it. I'm very pleased with how this turned out! It adds architecture and storage and I think makes the room feel much more well thought-out.
We went with a mirrored medicine cabinet with storage behind it, to maximize the amount of storage Ms. H gets overall. This is a small bathroom, and the only one in her house. Storage is important!
Moving on... The shower curtain, I will confess, I chose myself and surprised Ms. H. When I saw it on the JCPenney website, I knew it would be perfect for this space. It lends a great pattern and color to the room and the brown in it ties in with the oil rubbed bronze fixtures beautifully. A HUGE thank you to JCPenney for supplying this curtain to Ms. H. It totally makes the room, if you ask me! I'm impressed with the newer offerings in JCPenney's home department. This ain't your grandma's JCP!
Dad also added a privacy film to the window - you can get them at the home improvement store. It was a necessity as this bathroom is on the first floor.
When we began, Ms. H needed a space that was brought into the current decade. But it also needed to withstand the test of time. We wanted this room to look current and lovely 30 years from now, and if all goes as planned, this space should last at least that long! It was built to last!
That guided our design choices - white subway tile, beadboard wainscoting, neutral floors and counter. Timeless and versatile, clean and classic.
Last, I wanted to give you my best accounting of time and money that was spent on this room.
Labor was free for this project - but please remember if you are hiring someone to do this kind of job for you, that labor costs are at least half the total budget. This is hard work and if you want it done right, expect to pay someone for their time. We had the ability to volunteer our time for this project, and we wanted to… even then, the cost for materials was about $2000.
That includes everything - new subfloor and waterproof backer board around the shower. Tile, mortar, grout, and sealer for the floor and shower walls. Beadboard sheets, chair rail, baseboard, lumber for the built-ins, and trim around them. Mirrored medicine cabinet. Vanity, countertop, shower and tub fixtures, and some new copper pipe, as well as some plumbing supplies to install the vanity faucet. Primer, ceiling paint, and trim paint. Safety handles for the shower. Caulk and spackle. Privacy film for the window. Shower curtain rod and towel bars.
The light fixture and shower curtain were generously donated, as was the incredible RIDGID tile saw from the great folks at The Home Depot, which all would have increased our costs. Not that you have to buy a tile saw to do a project like this - you can certainly rent one, but that too has a cost.
As for time, my Dad was at Ms. H's house 5 days a week, almost without exception. I was there an average of 3-4 days as was Keith. I worked about 5 hours per day when I was there. Dad and Keith probably worked closer to 7 hours per day. And from demo to completion, it took us the better part of 6 weeks to complete this project. We did everything ourselves - demo, plumbing, electrical, carpentry, tiling, and painting.
I won't lie. It was a TON of work.

That said, I think there is enormous value in choosing to do this kind of work...

 learning new skills...


 becoming more self-sufficient...
and going beyond your comfort zone when it comes to getting your hands dirty and getting to know how a home functions, from the inside out.
I encourage you to educate yourself...
 do your homework..
 look around at the other phenomenal projects that people are taking on...
roll up your sleeves...
and take a risk.

Try something new.
 Learn.
 Work.
 Ask for help.
And reach out and give help to someone if you see that they need it.
(that's my cute mom, with Ms. H. Decades-long friends.)
I especially encourage you to find those around you who know how to do things that you do not. If you are fortunate enough to find them, take full advantage of it. People like my Dad and our friend Keith, pictured in many of the photos above, are wealths of information - and kindness. They are do-ers. Take a page from their playbook. Use your own two hands, your intelligence, and the unprecedented amount of information that exists in the world, and do something good.
This has been such a valuable experience for me personally. Spending this time with my Dad is an experience for which I'll always be grateful.
It's my hope that this room will give Ms. H much joy in the years to come. It has given us much joy to see it through to completion.
Thank you so much for coming along with me on this journey. I would absolutely love to hear your thoughts. I'd love to read about your projects. Why? Simple. Because Home Should Be GREAT.
XO,
Anne