Friday, September 27, 2013

What I'd buy on Craigslist this week - and what to do with it

Hi friends!

There is a chill in the morning air, I have a cup of Pumpkin Spice coffee in my hand, and we're plotting a trip to the pumpkin patch.  Fall is lovely right now.

Here's a few gems I found on my local (Cincinnati) Craigslist this week.  See what you think.  I also have a few tips for how I mine CL for the best and most useful things.

1. Buffet/server/sideboard.  This piece is classic, can be used in a million different ways and rooms, and did I mention it's $60?


 Put it in a foyer or front hall with a beautiful lamp and a mirror. This piece from the Turquoise Iris looks so gorgeous.

Use it in a bathroom as a vanity - just add a sink - there are tutorials all over Pinterest.
It just so happens that the super talented Traci and her husband Cy over at Beneath my Heart found almost the exact same piece as the one I picked this week.  It's in their master bath and it looks like a million bucks.


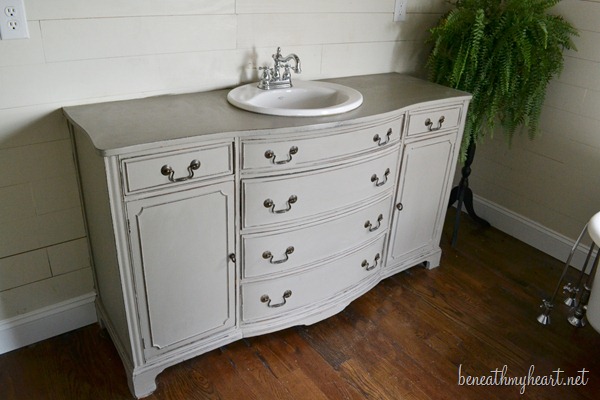
Or put your TV on it and have the classiest media stand around, like Carrie at Hooked on Decorating did.  (Again, almost the exact same piece - so cool!) I love that she took out the top drawer for technology stuff and had a piece of glass cut to fit the top.  Fantastic.

PS - tip #1 look at the other stuff in the picture/listing.  Be observant.  The other items this seller has - table and chairs, etc. are all awesome!


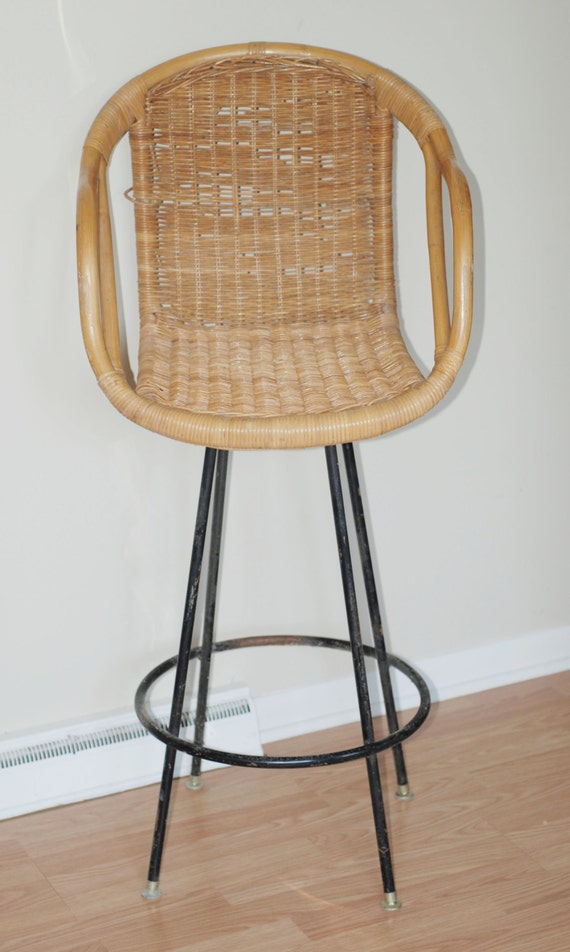
2. Vintage Gun Cabinet.

Stay with me.  Look at it for a minute.  What else does it look like to you?

It screamed hallway bench to me.  Apparently I'm not alone! Ericka at Rose Colored Glasses did exactly that.

Her piece rocks!

3. Pick up this entry bench for $20.  It looks like it's in great shape.

Yes, you can use it in the front hall or mudroom.  But a la Pottery Barn, you can also stick it at the foot of a bed
or use it as a coffee table. It's $20!!


4. Waterfall hutch

This can be turned into a lovely storage and display piece for just about any room.  Just as shown at The Weathered Door. Charming.


Tips for searching Craiglist with the best results?  Use the CraigsPro app.  It's far better than the actual website.  You can set up searches and it will notify you when there is a match.  You can also mark your favorites (which you can do online, too.)

Use the search limiting functions.  I usually start my searches looking only at items that are listed from $5 to $75.  It's a pet peeve of mine when people put $1 in the cost for the listing, so I just start above there.  Sort from the lowest price up, then check the most recent listings.  But don't forget to check the oldest listings.  If the item is still around, the seller may be very willing to negotiate and get rid of the thing they're selling!  Once you've skimmed through the items up to $75, you can then go higher if you want.  Remember - the price is just what the seller is asking.  It by no means is what you are required to pay...it's all up for negotiation, unless the seller says the price is firm.

Check different sections - Antiques, Furniture, General, Household, and yes, Garage Sale.  People list stuff everywhere, it seems.

Use keywords: cabinet, bookshelf/shelves, hutch, storage, drawers, and wood are all some of my go-to's.

If you want to see if you can get a better price than what's listed, I have found a good way is to simply write, "Would you be willing to work with me at all on price, please?" and then offer to pick the item up at their convenience.
Hard to say no to that... in my opinion. :-)

Hope Fall is fantastic wherever you are.
Cheers!

XO,
Anne

Friday, September 20, 2013

What I'd buy on Craigslist this week


Happy Friday!

Since my last Craigslist post, I had a friend contact me, and now one of my recommended CL finds is residing in my basement for her. :-) It's even better in person!  


The sellers said it belonged to their Grandma and they never seemed to find the right place for it. They called it the pumpkin chair.  I expect you'll see this in some fall sessions with the lovely and talented Emily Thies.

Now, onto some new finds!


I'm no vintage expert, and I cannot even for certain tell you the difference between wicker and rattan.  But I can tell you this old thing can still look fresh and modern, in a living room, on a covered porch... it just works.

Here's the stool version. A set of two for $400 on Etsy.
You can leave the wicker as-is and it will work in almost any room.  Or, you can try this and give it a French vintage vibe.


2. You could use these $40 glass display cabinets for anything. 

Of course, paint them white and store your dishes.

Make them all rustic and keep towels in them in your bath.
Add a great vintage-looking graphic to the doors and go old school.

Or paint the inside purple and put all your shoes on display.

If you're going to put a desk in a room, why not take advantage of the space above it - valuable real estate. A hutch like this does just that.  

I'm loving this minty green color.  

Very fresh.  Very Martha.  Might just make you want to sit down and pay the bills.

4. Here's a waterfall dresser (called that because the top front edge is rounded like, well, a waterfall. 

Ahem.  Pick this thing up for $45 (it looks like it's in great shape!) and do this.  I just love it.

5. Here's another tip when you're trolling Craigslist.  Every once in a while, go check the *Free section.  Yup, Free.  There will be lots of stuff like this:


BUT.  Every once in a while, there will be stuff like THIS:

Or these:

The *asterisk with these listings is that the good stuff often goes FAST.  You kind of have to be willing to get into your car the second you see something good.  But, hey.  It's free.

That's all for now.
No go forth and SAFELY start shopping the world's pre-loved items.  Make me proud!

XO,
Anne

Monday, September 16, 2013

Subway tile, the toilet is back, and the best. tile. saw. ever.


It's week FOUR, people, and things are hoppin' in this bathroom.

Did I already mention that the toilet got re-installed?  Woo hoo! No more potty trips to the gas station for us. :-)

Besides that, we the last week putting up subway tile - and some coordinating white trim tile - from the tub all the way up to the ceiling.  It was my choice to run it all the way up.  It was a little extra work, but I don't regret it one bit.

Getting the first, bottom row of tile straight was probably the most stressful part.  Shims - those little wood sticks - are crucial.  They kept the tiles from sliding down while the mortar was setting.  We used chalk lines and levels and our eyeballs to make sure nothing got out of line in that first row.


I chose subway tile for this bathroom for several reasons.  It is a great price performer.  Looks polished, fresh, and classic. It is the Little White Dress of kitchens and bathrooms as far as I am concerned.  I've used it before in two of my houses, and I'd use it again in a heartbeat.  White subway tile can do no wrong in my book.  When in doubt, use white subway tile.

These tiles were self-spacing, which just means they had slight ridges on the edges that save you from having to use spacers.  Just put your mortar on the back, and press it on the wall.  Slick it and stick it, as I like to say.  (Make sure it's level, of course.)

Now it's time for me to introduce you to my new bestie.  RIDGID's 8 inch wet tile and paver saw and stand, which you can find at the Home Depot.
This thing rocks.  The tiles that needed to be cut for this bathroom were probably a couple hundred, including floor and walls.  Using an inferior machine to do that, or trying to rush because we had rented  one would not have been fun.
 The folks at RIDGID and the Home Depot supplied us with this saw, and I'm not sure I can adequately express how grateful we were to have it.  We wanted to do something good to help out our friend (she needed a new bathroom, badly in case you missed it.)  And RIDGID and the Home Depot decided to do something to help us (we needed a tile saw, badly.)  This is a win-win.

So...We marked where the tile needed to be cut.


Before turning the saw on, we lined the piece up with the blade to make sure it would be correct, and then we turned it on, lowered the blade, and smooth as silk, this thing took care of it.
Effortless, really.  I feel completely comfortable using this by myself, and am thrilled with the results.  And my Dad?   Let's just say he petted the box when it arrived. LOL... what a fantastic tool to have in our "tool box" to pull off this job!  Thank you RIDGID and Home Depot!
It truly is one tile at a time, but it does move along pretty quickly - especially if you have several people - who can be measuring each space where a cut tile needs to go, making the cuts, putting mortar on the tiles, setting them into place, and making sure they stay where they need to be without any slipping.


The accent tile comes in a pre-cut set of four pieces, and we added a plain 4 inch white square to the center.  The rope trim is sold a single piece at a time.  All the tile came from the Home Depot.


Tiling this standard size tub all the way to the ceiling took us five solid days.  That's two or three people working 5-7 hours per day.  It's work.  But it is so do-able.   And the payoff is big. You know that advice that you should hang your window treatments as high up as possible to make a room feel larger?  I believe it worked here with tile, too.

A clean, white, unbroken space. I'm thrilled!


SO here's my take-away.  If you have the ability to take accurate measurements, the patience to mix mortar and grout to the consistencies necessary for spreading, the attention to detail to make sure your pieces are level and straight, and the willingness to learn how to operate a good piece of machinery safely, then I say taking on a tile project is a MUST-DO.  It adds value to your home, and it will make you smile every time you walk into the room!

Next post, grout and beadboard!

XO,
Anne (and Ken and Keith)